Make your own ball casters
Tom Gray tells all -- September,
2002
|
This article describes a low-cost, light-weight alternative in the BEAM tradition of scavenged and recycled parts.
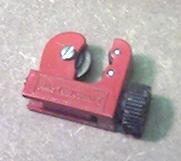
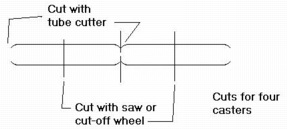
A telescoping antenna from any broken radio or minisystem is a low-cost alternative to expensive telescoping brass tubing from a hobby shop. Disassemble the antenna by cutting off the ball or cylindrical tip and any badly damaged metal from the bottom end. Push each section through from the top using a piece of stiff wire (caution: there are little brass bits inside that will fly around as they pop out!). This will give you several pieces of nicely chromed telescoping tubing. Note that one end of each section is swaged, that is, it has a slightly curved 'shoulder'. The next trick is to find a ball bearing (shortened from here on to BB, but don't try to use Daisy BBs intended for an air rifle, as they aren't round enough!) that fits into one sleeve of the tubing. I asked a local bike shop to save old BBs for a week, and got a wonderful if greasy selection; but you can buy them in little containers at many hardware or sports stores. The BB should drop into the tube easily but be caught by the swaged (curved) shoulder at the end. BTW, if you are making several casters of the same diameter, you can use a tubing cutter. This little tool will not only cut your tubing to length, it will also swage it at the same time. Use the tubing cutter to make your tubes twice as long as you need them (and maybe a little more) then saw them in half. This will give you tubes with one swaged end and one straight end.
In the version shown, I used the tip from an old mechanical pencil as a 'friction bearing' or 'pusher' to hold down the BB and minimize friction. But I have also used bits of nylon tubing, plastic washers, and nothing, all with reasonable success. I was just intrigued by the shape of the pencil tip and thought it would fit in beautifully, which it did. 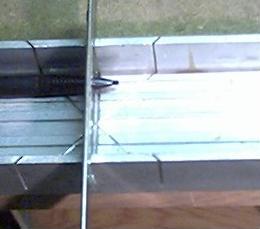 I cut off the tip, and drilled out the center a bit with a 3/8" drill to make a little 'cup' that the BB would fit in. But if you skip this part entirely, your ball caster should still work. Next you need a spring. Pick one from your junk box that will fit inside the antenna tubing and push the ball against the shoulder. For the caster shown here, I used part of a ball point pen spring. If you are not using a 'friction bearing,' check the spring for sharp ends and file smooth if necessary (at least the end that goes against the ball). Here is where a good set of needle files comes in handy! Another BTW, I have made ball casters without the springs, provided I had some kind of nylon bushing to hold the ball in place. But it seems to be easier to find a spring the right size than to find a nylon bushing the right size.... Now, decide how long you want your caster to be. If you have a bot in mind, measure the distance from workbench to chassis. Use a hacksaw, hobby saw, or dremel cut-off wheel (safety glasses, please for this last) to cut the tubing the right length. 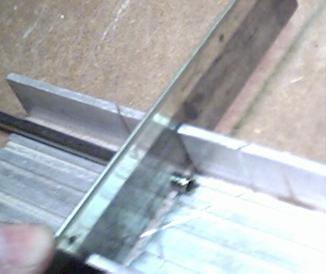 The spring should be slightly compressed between the ball and the mounting nut, but if it is too squished, the ball won't turn. Use your cut-off wheel or file to cut the spring shorter if necessary. When the spring tension is right, you should be able to push the ball in with your finger, but the weight of the bot will not move the ball much at all. The figure below shows all the parts so far, laid out in order. 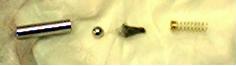 Last step! Find a little nut and bolt for mounting. The nut should just fit into the end of the tube. If the nut's a little small, you can GENTLY squeeze the tubing a bit so the nut will wedge in. If the nut's a bit too big, you may have a bit of work ahead with the Armstrong milling machine (that's a file). Once you have the nut in, hold it with your finger (to avoid that sproing!) and check the tension again. If all is well, disassemble, clean everything carefully (including the inside of the tube-a pipe cleaner works okay here) to bet rid of any filings or dirt, and reassemble with a little Vaseline or bearing grease (or, if you prefer, assemble dry and later spray in a little WD40 or whatever). Clean off the open end of the tube and solder the mounting nut into place. 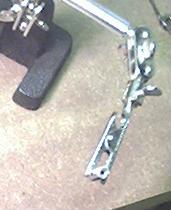 The figures below show the caster mounted on a robot chassis made from the front of an old stereo. 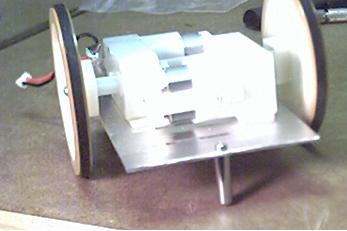 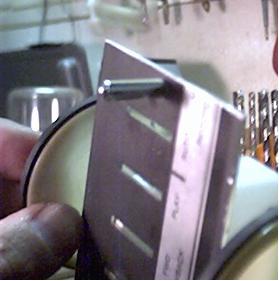 I have tried other mounting methods. My first
try involved slotting the tubing and folding little
flaps in to hold the spring then epoxying the whole
assembly to the chassis. This worked tolerably
well. Another version had flaps folded out to
increase the gluing surface. The method shown here,
while a bit more work, gave the best-looking result
and is the method that lets me easily relocate or
reuse a caster. |
 A
ball caster is a type of 'wheel' that allows smooth
movement in all directions. A miniature ball caster
would be a wonderful addition to a light-seeking
BEAM robot, reducing the friction from a
tail-dragging capacitor. And it provides an
alternative to a tail wheel for other wheeled bots.
Most commercial versions, which come with balls
from 1" and up, are too large and heavy for
miniature robotics. Smaller casters are available
but are expensive.
A
ball caster is a type of 'wheel' that allows smooth
movement in all directions. A miniature ball caster
would be a wonderful addition to a light-seeking
BEAM robot, reducing the friction from a
tail-dragging capacitor. And it provides an
alternative to a tail wheel for other wheeled bots.
Most commercial versions, which come with balls
from 1" and up, are too large and heavy for
miniature robotics. Smaller casters are available
but are expensive.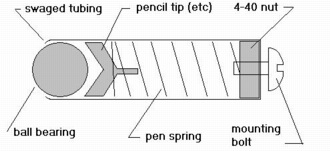
|
|
||
|
|
This page was last updated on |
|