|
|
|
|
The BEAM Circuits Collection is a BEAM Reference Library site.
Op-amp based Nv nets
A very tweakable way of building
bicores
and quadcores and such...
In a post in July of 2003, Bruce Robinson published a set of circuits implementing Nv neurons via op-amps. Here's his presentation:
At first glance, just another bicore variation, but with a higher component count. It seems to reverse the BEAM drive toward simplicity (i.e., more parts, no apparent increase in functionality). But wait ...What I've done is use an LM324 op-amp to build a bicore (two bicores will fit on one chip). Why use an op-amp? Because you can vary the trigger threshold to change the bicore timing. It turns out that this can have some advantages over the usual practice of varying the R-C time constant.
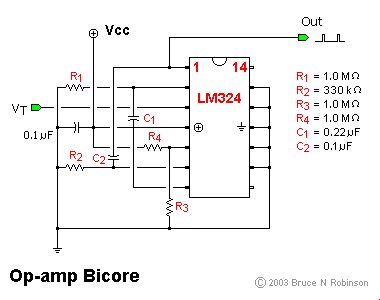
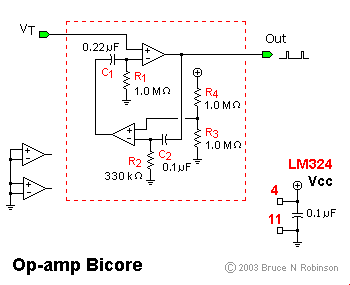
The first image shows the pinout diagram for the basic bicore. The second image is the schematic for the same circuit, and I'll use that for a brief explanation of how the circuit works. You should recognize a basic bicore configuration -- two IC devices acting like inverters, each one with a resistor and capacitor connected to the input (R1 & C1, R2 & C2). What's different is the extra input to each "inverter" -- this sets the trigger threshold. In the upper "neuron", input VT is a variable threshold that controls the bicore frequency. In the lower "neuron", I've set the threshold to a constant -- 1/2 Vcc -- using resistors R3 & R4. The smaller values for R2 and C2 make a short, constant-width pulse. You can replace R3 & R4 with a trimpot (or other circuit) to give the lower neuron a variable delay as well. The values I chose are just about right for driving an LED so you can play with the circuit on a breadboard. Raising the value of VT means it will take less time for the upper neuron to reach its threshold, so the bicore will speed up. Lowering the value of VT makes the neuron take longer to time out, so the bicore slows down. You can test this effect by connecting a trimpot between Vcc and GND, with the center lead connected to VT.
If your goal is to set the frequency of a bicore using a trimpot, there isn't much point in using this circuit -- just make R1 and/or R2 variable instead, and use inverters instead of op-amps. But if you want to vary the bicore frequency using a circuit, my design has some advantages.
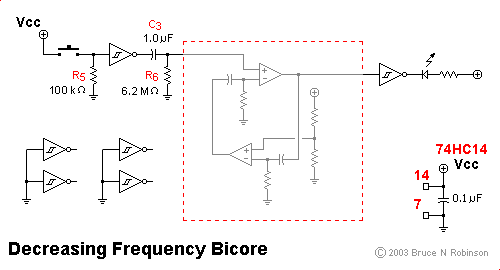
The above image shows just one way to use this circuit. Here I've taken the basic op-amp bicore and connected an R-C pair (R6, C3) to the VT input. Pushing the pushbutton will drive the inverter output low; when the pushbutton is released, the inverter output will go high, charging capacitor C3. This will cause the bicore to pulse very quickly. As the charge on C3 drains off through R6, the bicore will slow down.
I've shown an inverter connected to the output, driving an LED. Technically you can drive a low-power LED directly from the op-amp output, but keep in mind that the maximum output voltage from the LM324 is 1.5 volts below Vcc. I added the inverter to the output to keep the LED nice and bright. The effect of this circuit is to cause the LED to flash very quickly when the pushbutton is pushed and released, and then to gradually slow down.
If you attach the same circuit to a motor driver of some kind, the result will be a PWM speed control that causes the motor to spin quickly at first, and then slow down gradually to a crawl. Sounds a bit like Wilf's recent design, doesn't it?
Other applications come to mind. Use this circuit as the slave in a master-slave bicore. Make both thresholds variable and you can change the timing relationship between the master and the slave.
Or create a chain of regular Nv neurons and connect each output to one of these bicores, using C3 and R6. As an impulse travels through the Nv chain, each bicore will be triggered in turn, causing some interesting visual effects. Try it with a 3-neuron chain, or a tricore, and hook each bicore output to a 3-colour LED to get interesting multi-colour visual patterns (Jenny? Tom?).
This is a nice little circuit to play around with on the breadboard to see just what you can do with it.
In a subsequent post, Wilf Rigter adds his own commentary and another circuit:
Amazing Bruce!The opamp grounded bicore. As a design concept, a simple yet completely overlooked BEAM circuit.
Some years ago I designed the "perfect" suspended bicore using opamps. As the theory indicated, the more perfect the suspended bicore, the less likely it would oscillate and after proving, that I ended my investigation (I mean what's the point of designing oscillator that doesn't oscillate 8).
I have lately posted some analog comparator based circuits including the Rainbow LED, and motor controller circuits both of which use PWM. The LM339 is an attractive alternative to the LM324 for these pulse circuits although it requires a pullup resistor for each output. Come to think of it, I did post a rather similar grounded bicore circuit for joystick reversing speed control some time ago but it was buried deep inside that circuit and not presented as a general purpose BEAM solution.
Grounded bicores don't have such problems with perfection and have two separate "Nv neurons" with independent time constants that can be electronically controlled.
With the exception perhaps of the suspended bicore, designing opamp versions of other BEAM circuits that previously used 74HC14s or 7HC240 inverters (microcores, monocores, heads) opens the door for more predictable and repeatable BEAM circuits operation, finally allowing for time constants to be based on calculated component values. In addition, the voltage controlled thresholds add a new dimension to sensor inputs.
With many BEAM solar engines operating at 2.5V, it should be noted that the LM324 requires a minimum 3V supply but the LM339 can operate down to 2V. Both require about 1mA of supply current. Maximum operating voltage for both is >30V allowing for automotive BEAM applications that run directly from the car battery. These devices also meet another important BEAM requirement of ready availability and low cost. For special micropower applications, there are plug in CMOS versions of these chips that operate below 1V and draw just a few uA of supply current.
I also have some comments on Bruce's description of operation:
Bruce said,
"Other applications come to mind. Use this circuit as the slave in a master-slave bicore. Make both thresholds variable and you can change the timing relationship between the master and the slave".The nature of the slave bicore is that, unlike a grounded bicore, the two Nv neurons are not independent from each other. Both Nvs always fire at the same time depending on which has the shorter time constant. That was demonstrated by Mark Tilden by removing one coupling resistor (i.e., infinite resistance) to show that the circuit continued to operate, i.e. was robust. This circuit behaviour is even easier to demonstrate with an opamp slave bicore as the control voltage adjusted on one Nv, its time constant can be made shorter but never longer than the second Nv time constant. In fact, if the second Nv voltage control is near Vcc /2, then as you attempt to lengthen the first Nv time constant beyond 50%, it starts to shorten again! Can you see why? This little side trip into slave bicore behaviour may be useful because otherwise experimenting with this circuit could lead to surprising, if not frustrating results.
Bruce said,
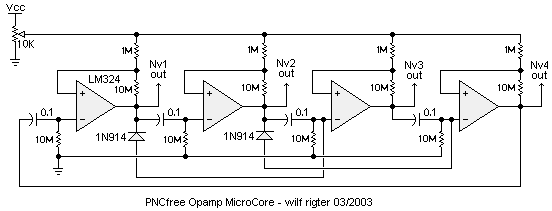
"Or create a chain of regular Nv neurons and connect each output to one of these bicores, using C3 and R6. As an impulse travels through the Nv chain, each bicore will be triggered in turn, causing some interesting visual effects. Try it with a 3-neuron chain, or a tricore, and hook each bicore output to a 3-colour LED to get interesting multi-colour visual patterns (Jenny? Tom?)."This can be done entirely with Opamp Nv's but a microcore, etc. requires inverters with hysteresis (Schmitt triggers) as shown in the below Opamp microcore circuit. The common control voltage from the 10K pot adjusts the duration of all Nv together each Nv threshold input could be adjusted with a separate voltage.
And Bruce ended his wonderful OpNv introduction urging:
"This is a nice little circuit to play around with on the breadboard to see just what you can do with it."Also check out manufacturer's application notes for opamps, comparators and other linear devices. In the past, when there were fewer special purpose analog devices let alone DSPs or microcontrollers, there were thick books of application notes for opamps available for free from National, Fairchild, Motorola and others. These were linear "cookbooks", complete with lists of ingredients and equations for copying or adapting the application note circuits into your own designs.
These elegant and always simple application circuits also inspired generations of analog designers, who adapted, crossfertilized and evolved those simple circuit ideas into many of today's specialized analog building blocks. I have several 20 year old (but timeless) well thumbed copies of these linear applications books on my shelf. AFAIK many of these are still available on request but now probably only on CD.
|
|
||
|
|
This page was last updated on |
|