|
|
|
|
The Micro Crawler 1-motor walker
circuit
Wilf's minimalist walker
The Micro Crawler (a.k.a. uCrawler) is an interesting design for a 1-motor walker, presented by Wilf Rigter in 1999. Since the alt-beam moderator essentially locked his keys in the car, no new members are able to join this list (and only members can read posts on the list). As a service to alt-beam non-members, here is Wilf's presentation of his design (only slightly edited for spelling and such).
04/10/99 - WILF RIGTER
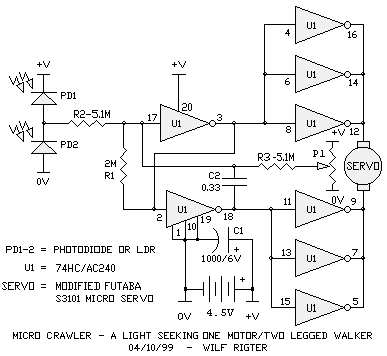
Hello and welcome to another BEAM article. This time I present a new generation walker and a new feedback method. The Micro Crawler is really a devolutionary step in walker design, in fact it is less of an insect and more like a tidal pool creature crawling in the mud from whence it came (more on that later). However it is also a drastic overall design simplification and has some interesting emergent behaviour and as such is perhaps worthy of consideration as a separate BEAM species. Besides, uCrawler also includes a new leg centering method which I call the BEAM feedback servo which has potential applications in higher order walkers.
The inspiration for this design came from the realization that rear legs of a multi motor walker are often slaved and synchronized to the front legs and in a sense are "idler" legs. The other example that turned on the lightbulb was the simplicity of the single motor symet and in nature the lungfish or mud hoppers provide an example.
The uCrawler V1.0 is photoropic and will nicely crawl towards and follow a bright light source. The other feature of the V1.0 is its preference for somewhat rough surfaces, i.e., sofa cushions and short fiber Persian carpet. Future work will attempt to optimize the "feet" to make the crawler compatible with smooth surfaces and additional work is required to add reverse motion. As variations on the theme, ideas for sand and amphibian crawlers are also roiling on the event horizon.
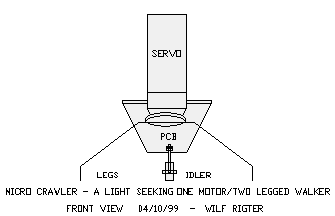
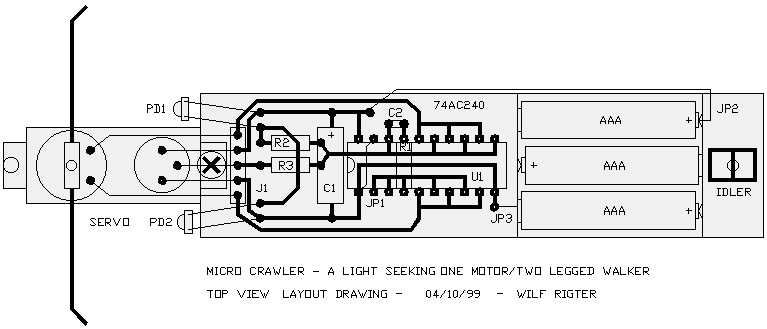
THE uCRAWLER BODY
The uCrawler v1.0 body is little more than a head and a tail consisting of three parts:
1) A modified hobby servo with a pair of legs (or flippers) at the front of the walker.2) A long sloping PCB "tail" attached to the servo, containing photosensors, the Servo Core, and the battery pack.
3) An idler wheel attached near the end of the tail supporting the battery.
The side and front view drawings illustrate the overall body layout.
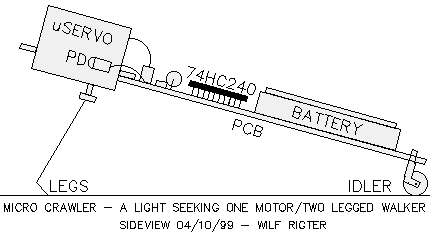
THE IDLER WHEEL
The idler wheel turns the uCrawler into a bit of a hybrid using the best of wheeled and legged creature worlds. Unlike most wheeled bots' idlers, the ucrawler wheel does not swivel and remains always fixed in-line with the body.
The idler wheel serves two functions: it supports much of the weight, and acts like a resistance to the reaction of the leg motion (which causes cute but otherwise useless tail wagging behaviour). In a sense it is also like a stabilizing fin or a tail rotor of a helicopter. The resistance to sideways tail motion is the reason for not allowing the wheel to swivel.
In the prototype I used a soft rubber capstan idler wheel and bracket from a walkman tape recorder bolted to the bottom at the end of the 6" tail.
THE STANDARD HOBBY SERVO
Many readers are already familiar with the hobby servo but I will include a short description of it's design and operation. The unmodified servo consists of a boxlike housing with two mounting ears, an output shaft and 3 pigtail wires for power and control signals. After removing four screws, inside the housing we find a small PCB with the control decoder and driver electronics, a small permanent magnet motor with a gear box and a feedback potentiometer connected to the output shaft. The output shaft has a mechanical stop attached which prevents the shaft from rotating more than about 180 degrees. The servo is therefore designed for partially rotating the output shaft like a bicycle steering wheel or as a powered joint for robot arms or legs.
The hobby servo uses 0V and +3-6V power connected to the black and red wires respectively and the electronic driver is controlled with pulse width modulated (PWM) control signals on the white wire.
|
Important note: servo wire color codes vary and using the wrong hookup can destroy the servo! Always check for the correct color code for your servo. |
The PWM signals are narrow positive pulses which are 1.5ms in width with a maximum deviation of +/-0.25 ms. This corresponds to the output shaft center position and up to +/- 90 degree clock wise (CW) and counter clockwise (CCW) rotation. The repetition rate of the PWM signals is usually between 20-100 pulses per second for smooth servo control. When the pulses cease the servo remains in the last position.
THE MODIFIED HOBBY SERVO
While it is possible to generate the required pulses using BEAM circuits, as reported in a previous article, most BEAMers just rip the electronic guts out of the servo and often remove the mechanical stops as well. Other roboticists just remove the stops and sometimes the feedback pot in order to convert the servo to a bi-directional continuous rotating gear motor for driving wheels etc. with speed and direction controlled by PWM pulses from a micro controller chip.
When servos are used for BEAM bicore or microcore walker applications, the perpetual problem of centering the legs rears it's ugly head. Springs and gravity are alright but by modifying the servo we have also removed the excellent position feedback circuit which would be perfect for centering or steering legs in a BEAM walker if it weren't for the need of generating the precise control pulses.
SERVOS FOR BEAM WALKERS
Unlike most other servo applications, walkers require servos which constantly "reciprocate" back and forth. BEAM walkers use microcore or bicore oscillators to apply a constantly reversing voltage across the motor winding. The signals are applied without output shaft feedback and instead gravity or springs are used to load (slow) the servo at the end of travel like soft mechanical stops and to coarsely center the legs. While it would be possible to use BEAM circuits to generate the 1.5 ms pulses +/-0.25 ms, it would require a fair bit of additional circuitry to what is supposedly the simplest possible design. The uCrawler design gets around the problem by dumping the PWM control circuit and putting a very simple BEAM like oscillator in the position feedback loop. Before discussing the electronics let's first look at the required servo mods.
HACKING SERVOS - BEAM SERVO STYLE
The uCrawler modifies the Servo by removing the electronics PCB and by connecting 2 wires to the motor terminals and 3 wires to the servo pot for a total of 5 wires, to connect to the external control circuit. The uCrawler circuit is so simple that a standard size version could be easily mounted inside a standard servo housing and future revisions will do just that. When using the smaller "micro" servo housing, used in the prototype, SMT components would be required for an internal control board.
Since the servo pot is connected to the output shaft, the moving "wiper" contact changes the ratio of resistance for the upper and lower terminals. If the outside terminals of the pot are connected to +V and 0V, then the voltage on the wiper contact is proportional to the rotation of the output shaft and the legs connected to the servo.
"Great!", you say, "let's connect the pot to the bicore to center the legs!" "Hmmm, sorry, but the resistance is only 5K and incompatible with the bicore circuit" says I (and others before me). So what is needed is a little adaptive circuit design which turns out to utterly simple.
THE SIMPLEST BEAM SERVO
There is a very simple circuit which is basically a 74HC14 Schmitt trigger circuit which uses the servo motor and potentiometer for feedback to create the oscillation and side to side rotation. This circuit's operation is very simple and easy to explain. The circuit shown in the EARLY SERVO1 drawing.
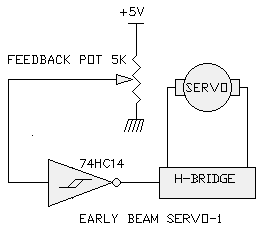
Let's assume that the output shaft and pot are rotating CW and that the wiper voltage is becoming more positive. When the wiper voltage crosses the positive threshold of the Schmitt at about 2/3 Vcc, the circuit output switches and the motor reverses. Now the motor has to rotate CCW until the wiper voltage drops to 1/3 Vcc at which point the Schmitt trigger changes state once again and the motor rotates CW. This continues indefinitely with the legs moving back and forth, precisely limited to maximum CW and CCW positions. While this provides 100% position feedback, it is single minded in it's operation.
ADDING SOME MORE FEEDBACK
This simple HC14 circuit can be slightly modified to add features such as fine tuning the centering of the legs or to add phototropic behaviour. This is done by adding a summing network to combine the output of several feedback sources. The summing resistors should be large resistances in comparison to the feedback source resistance for signal isolation.
EARLY SERVO2 shows a second centering pot and a summing resistor to fine tune the center of rotation. Since the 10M summing resistor is 10x larger than the summing resistor of the servo pot, the effect of adjusting the centering pot is about +/- 10% of the total rotation around the center point. In addition, a pair of Light Dependent Resistors (LDR) act as a voltage divider, the output of which is summed via a 10M resistor with the output of the servo feedback pot and the centering pot. Again the effect is approximately +/-10% of the total rotation around the center point. So the effect of an imbalance of the LDR network (unequal light) turns the center of leg rotation towards the light source, which makes the bot photoropic. Reverse the connections of +V and 0V to the LDRs and the bot becomes photophobic.
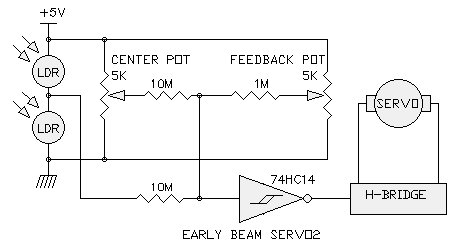
SIX SERVOS IN ONE CHIP
Now the remarkable fact is that the BEAM feedback servo uses only 1/6 of a 74HC14 IC and some resistors to provide the logic: 6 servos in one chip is well within the normal parameters of BEAM simplicity.
But there is a caveat: If a leg is trapped and is prevented from reaching the end point of CW or CCW rotation the circuit will simply sit there, stalled and possibly overheating, until there is divine intervention from it's creator to free the legs and allow normal operation to continue. By comparison a bicore walker would continue to oscillate and move and use this motor load "feedback" to shift the center of rotation providing a better chance of freeing the trapped leg. The bicore walker doesn't really know and is not so single minded about where it is "supposed" to go. While adding a cap and one more feedback resistor can provide the desirable continuous oscillation in case of a stall, an alternative solution which also provides the motor drivers was used for the final uCrawler V1.0 circuit.
THE V1.0 BEAM SERVO
Now let's look at the uCrawler circuit design. Like a standard bicore it uses a 74HC240 (or better yet, a 74AC240 ) but the oscillator is more like a monocore circuit. The bottom line is that it uses 2 inverters for the oscillator and summing network and the 6 remaining inverters for motor drivers. The design also solves the "stalled leg" problem and of course requires no springs!
With reasonably well matched LDRs I found that it was not necessary to add the "centering" pot in the final design since the center error was very small and not cumulative as it would be in a conventional bicore design.
A TAIL OF A PCB
The PCB shown in the top layout drawing is a proposed layout: the prototype uses a 3" x 4" solderless proto board and 3V battery pack taped to a plastic strut. Without the extra weight of the protoboard and the 4.5V batteries I expect a pretty lively crawler. There is enough detail in the layout drawing that would allow an ambitious BEAMer to make his own PCB. In the prototype and PCB the LDR pair should be facing forwards and bend towards the front of the crawler one LDR on each side of the servo housing. The fixed resistors can be replaced with pots and you will have a lot of fun like I did to determine useful combinations of resistor values. The fixed values shown are a the best combination of resistors to date.
Like any good fish story , I can imagine an aquatic version of the crawler with flippers swimming (or more accurately paddling) around the pool with a long tail and fin replacing the idler wheel. Alternately drive the tail with the servo and use pectoral fins for stabilization. Afraid of water? Perhaps let your imagination fly and fancy dress the uCrawler in feathers (no tar please) or with modified feet perhaps if sand's your game.
A final comment on the prototype: the legs are bent at 90 degrees apart and each is about 2" long. The tip (1/4") of each leg is also bent back so that it slides forward with little resistance but when pushing back, the tips digs in for good "purchase" (look it up in the dictionary heheh!) The speed of the prototype is about 1-2" per second depending on the surface.
|
|
||
|
|
This page was last updated on |
|