|
|
|
|
The BEAM Circuits Collection is a BEAM Reference Library site.
The Power Smart Heads
A family of head circuits by Wilf
Rigter
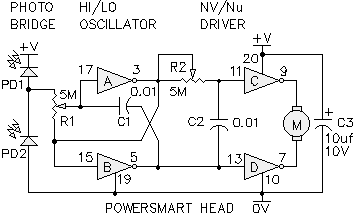
The power smart family of head designs springs from a simple battery-powered design:
Recently, Wilf posted this explanation of its workings:
|
The PD1 / PD2 photobridge acts as a voltage divider with the midpoint at Vcc / 2 when the light on each PD is equal. The response is linear over a wide range of ambient light levels. Some PDs are very efficient and may need some light shielding (i.e. heat shrink) to reduce the photo current level in very bright light. The hi / lo oscillator uses R1 / C1 to set the basic frequency. Resistor R3 connected from the photobridge midpoint to the R / C node of the oscillator is used to influence that frequency. That frequency depends on the voltage of the midpoint as well as the absolute resistance of the PDs. In general, the frequency is the lowest when the PD bridge center voltage is near the threshold of the 7AC240 inverter input. With an R1 to R3 = 10 to 1 ratio, the frequency and the duty cycle varies when the PD output voltage is within 10% (+ / -) of the threshold. Voltage levels above and below that +/-10% range will cause the output of the oscillator to stop and will be steady high or low, inverted with respect to the input voltage. The band of oscillation can be made more or less by decreasing or increasing the ratio of R1 and R3 values (i.e. if R1=R3 it always oscillates). I use typical ratios of between 2 to 1 and 10 to 1. If the ratio is high, the sensitivity is greater but the tendency to wiggle is also greater. Remember a shaky head is not power efficient. For some applications that have lots of build in damping (i.e. Submarine head, Mazola head) R3 can be 0 ohms ;). The Nv / Nu driver (also called Nx driver) both differentiates and integrates the complementary outputs from the oscillator. When the oscillator oscillates, the Nx driver AC couples the output pulses noninverted as the Nx time constant is longer than the oscillator period. With AC coupled (non-inverted AC) pulses in phase across the motor, the PSHead is in the power save mode but with the brake on! That is important to be able to stop the motor rotation quickly to avoid mechanical overshoot when the head is aligned with the light source. When the oscillator stops oscillating theres are no pulses to AC couple and instead, the steady output is DC coupled (and inverted) to cause a differential voltage across the motor which then rotates. The ratio of the R1 / C1 and R2 / C2 time constant should be about 1 to 10 for low standby power. Smaller ratios can be used for faster and more "varied" response but sometimes higher standby current. Since the R1 / C1 time constant is influenced by R3 and the photo bridge output voltage, that ratio will vary with light level. The ratios of those two RC time constant component values cause a variety of behaviour, sensitivity and efficiency. For solar powered PS Heads, the time constant of R2 / C2 should (probably) be much shorter than the duration of the SE pop or some unpredictable (perhaps interesting) side effects may occur. |
This PowerSmart head circuit was solarized, courtesy of Darrell Johnson, and dubbed the Solar Power Smart Head (SPSH). The SPSH circuit has been tweaked from time to time (each time improving its efficiency); the most recent update posted by Wilf is shown here:
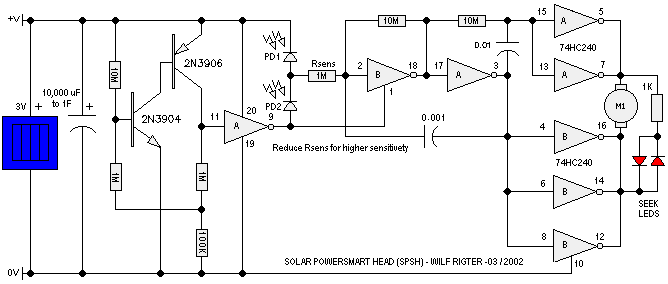
Circuit schematic (click to enlarge) |

Circuit layout (click to enlarge) |
There's also a corresponding 2 degree of freedom (i.e., for a 2-axis head) version of this circuit:
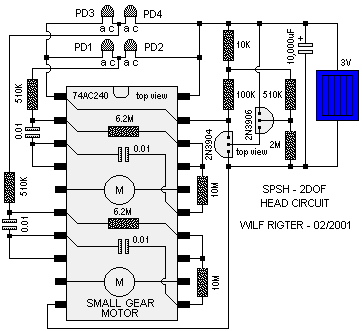
Circuit layout (click to enlarge)
Recently, Wilf posted version 3 of the SPSH -- this time with an LED flasher circuit. Here's Wilf's explanation:
I checked some RS FLEDs I have and the average current is about 2 ma. I designed a new 74HC240 LED flasher circuit which has an average current of about 100 uA. The LED flashes much brighter than the FLEDs. The circuit provides some voltage boost so it works down to 1.5V. The low power LED flasher comes on when the SE triggers and stays on until the SE resets. The rest of the SPSH layout has been changed somewhat to simplify connections between IC pins. A SPSH4 design is next that replaces the 1381 with two transistors and provides dual motor drivers.
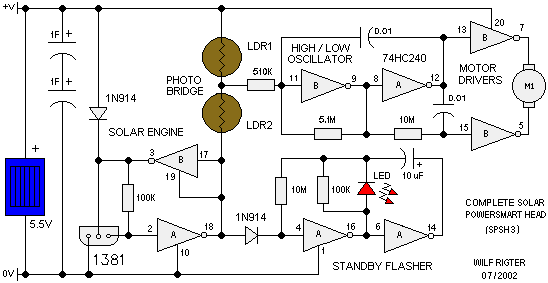
Circuit schematic (click to enlarge) |
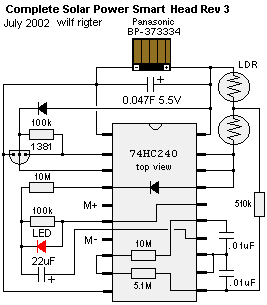 Circuit layout |
|
|
|
|
|
|
||
|
|
This page was last updated on |
|